
Reference
If you want to assign the contract to a range of customers in specific sales territories, classes, with specific discount matrixes or default prices, refer to the next section "Edit - Assign Contract".
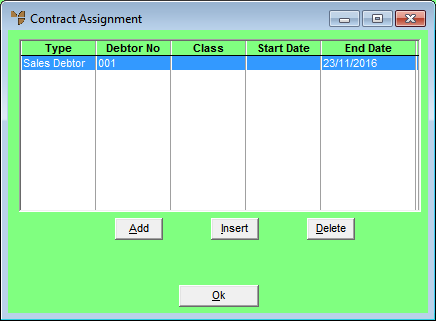
Use this option to assign a contract to a specific debtor, to a central debtor, to a specific debtor class or to all debtors. You can also view all the customers to which a specific contract has been assigned, and add and delete contract assignments.
|
|
|
Reference If you want to assign the contract to a range of customers in specific sales territories, classes, with specific discount matrixes or default prices, refer to the next section "Edit - Assign Contract". |
|
|

|
Warning If your company uses SalesLink/Opmetrix to receive customer orders into Micronet and you want to apply a debtor contract to all debtors, you should always use this method to create debtor contracts. This minimises the number of pricing records created by Micronet, speeding up the process of syncing data to mobile devices. For more information, refer to "Creating Debtor Contracts for SalesLink / Opmetrix". |
To view or manage the customers to which a contract is assigned:
Refer to "Adding a New Debtor Contract" or "Updating a Debtor Contract".
Micronet displays the Contract Assignment screen listing all customers to which this contract has been assigned.
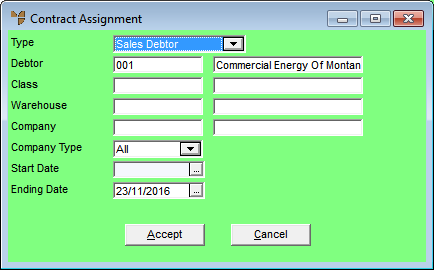
If you selected to add, insert or edit an assignment, Micronet displays the (Add) Contract Assignment screen.
|
|
Field |
Value |
|---|---|---|
|
|
Type |
Select the debtor(s) to whom you want to assign the contract. Options are:
|
|
|
Debtor |
If you selected Sales Debtor or Central or Sales Debtor in the Type field, enter or select the ID of the debtor to which this contract is assigned. |
|
|
Class |
If you selected Debtor Class in the Type field, enter or select the ID of the debtor class you want to assign this contract to. |
|
|
Warehouse |
To assign this contract to a specific warehouse, enter or select the warehouse ID. |
|
|
Company |
If inter company trading (ICT) has been setup (refer to "Edit - Program - Inter Branch Transfer"), you can assign this contract to a specific company. Enter or select the company ID. This is used by the Micronet Online Ordering system (MOO). For more details, refer to "9. Micronet Online Ordering". |
|
|
Company Type |
If you selected a company in the previous field, select the company type . Options are:
|
|
|
Start Date |
Enter or select the start date for this contract assignment. |
|
|
Ending Date |
Micronet displays the Expiry Date for the contract from the Debtors Contract File Update screen. You can change this date if required. |
Micronet redisplays the (Add) Contract Assignment screen for you to add more assignments to this debtor contract.
Micronet redisplays the main Contract Assignment screen.
Micronet redisplays the Debtors Contract File Update screen.